
개요
이번에 운 좋게도 지인을 통해 세차새차라는 세차장 중개 플랫폼을 운영하는 스타트업의 프로젝트에 참여하게 되었는데, 첫 과제로 웹 소켓을 활용한 실시간 통신 기능을 구현하게 되었다.
요구사항
주어진 요구사항을 요약하면 다음과 같다.
사장님이 고객으로부터 전화를 받았을 때, 실시간으로 사장님의 아이패드(=세차장 사장님 인터페이스)에 전화를 건 고객의 정보가 입력된 예약 모달창을 띄워준다.
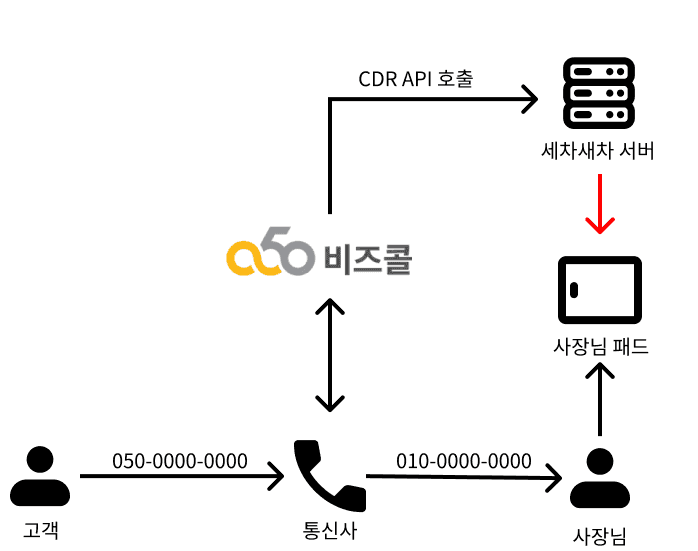
이 요구사항을 어떻게 구현하느냐? 요구사항 중 '실시간으로'라는 키워드를 충족시키기 위해 우리는 웹 소켓이 필요하다. 일단 알아둬야 할 사전 지식은, 세차새차는 비즈콜이라는 외부 서비스를 통해 사장님과 고객 간의 통화를 중개하고 있다는 점이다.
고객이 전화를 건 시점에 비즈콜이 세차새차의 CDR API를 호출하므로, 백엔드 단에서 CDR API가 호출되었을 때 특정 웹 소켓 경로로 메시지를 보내도록 구현하고, 프론트엔드 단에서 해당 메시지를 수신하도록 구현해주면 실시간으로 고객의 통화 정보를 프론트엔드 단으로 가져올 수 있다.
이러한 과정을 도식화하면 다음과 같이 표현할 수 있다.
 여기서 붉은 색 화살표에 해당되는 동작을 백엔드와 함께 구현해야 하는 것이다.
[도메인 지식] 비즈콜(Bizcall)이란?
고객이 업체로 전화를 걸었을 때 고객과 업체 간의 통화를 중개해주고 전화 내역을 데이터로 제공해주는 안심번호 서비스.

백엔드 구현에 대한 명세는 백엔드 개발을 맡은 나의 친구 보름의 블로그에 기재되어 있으니 궁금하신 분은 참고하길 바란다.
구현 과정
*사용된 기술 스택은 TypeScript+Next.js이다.
'use client';

import { useEffect, useState } from 'react';
import Button from '@mui/material/Button';
import TextField from '@mui/material/TextField';
import Dialog from '@mui/material/Dialog';
import DialogTitle from '@mui/material/DialogTitle';
import DialogActions from '@mui/material/DialogActions';
import DialogContent from '@mui/material/DialogContent';
import { Client, IMessage } from '@stomp/stompjs';
import SockJS from 'sockjs-client';
import { toast } from 'react-toastify';
import { API_SERVER } from '@/constants/env.constant';

export interface CustomerInformation {
	fromNumber: string;
	stardDate: string;
}

interface BizCallProps {
	slug: string;
}

export default function BizCall({ slug }: BizCallProps) {
	const [openModal, setOpenModal] = useState<boolean>(false);
	const [customerInformation, setCustomerInformation] = useState<CustomerInformation>({
		fromNumber: '',
		stardDate: '',
	});

	const handleReceivedMessage = (message: IMessage) => {
		const callInformation = JSON.parse(message.body) as CustomerInformation;
		setCustomerInformation({
		fromNumber: callInformation.fromNumber,
		stardDate: callInformation.stardDate,
		});

		setOpenModal(true);
	};
	useEffect(() => {
		let stompClient: Client | null = null;
		const connect = () => {
			const socket = new SockJS(`${API_SERVER}/ws/v1/offline-store-pad`);
			stompClient = new Client({
				webSocketFactory: () => socket,
				onConnect: () => {
					stompClient!.subscribe(`/ws/v1/topic/call-store/${slug}`, handleReceivedMessage);
					toast.success('소켓이 연결되었습니다.');
				},
				onStompError: (frame) => {
					console.error('Broker reported error: ' + frame.headers['message']);
					console.error('Additional details: ' + frame.body);
				},
				onWebSocketClose: () => {
					toast.error('소켓 연결이 끊어졌습니다. 재연결을 시도합니다...');
				},
			});

			stompClient.activate();
		};

		connect();

		const reconnectInterval = setInterval(() => {
			if (stompClient && !stompClient.connected) {
				connect();
			}
		}, 5000);

		return () => {
			stompClient?.deactivate();
			clearInterval(reconnectInterval);
		};
	}, []);

	return (
		<Dialog open={openModal} onClose={() => setOpenModal(false)}>
			...
		</Dialog>
	);

}
위와 같이 Bizcall.tsx 컴포넌트를 작성했다. 웹소켓 연결을 위해 sockjs 라이브러리를 사용했고, STOMP 프로토콜로 웹소켓 메시지를 받아오기 위해 stompjs 라이브러리를 사용했다. 이 코드에서 핵심이 되는 connect() 함수를 해부해보자.
let stompClient: Client | null = null;
const connect = () => {
	const socket = new SockJS(`${API_SERVER}/ws/v1/offline-store-pad`);
	stompClient = new Client({
		webSocketFactory: () => socket,
		onConnect: () => {
			stompClient!.subscribe(`/ws/v1/topic/call-store/${slug}`, handleReceivedMessage);
			toast.success('소켓이 연결되었습니다.');
		},
		onStompError: (frame) => {
			console.error('Broker reported error: ' + frame.headers['message']);
			console.error('Additional details: ' + frame.body);
		},
		onWebSocketClose: () => {
			toast.error('소켓 연결이 끊어졌습니다. 재연결을 시도합니다...');
		},
	});

	stompClient.activate();
};
먼저 SockJS 라이브러리를 통해 웹소켓 통신을 위한 객체를 선언한다.
const socket = new SockJS(`${API_SERVER}/ws/v1/offline-store-pad`)이 때 인자로 넣어주는 url는 백엔드 단에서 선언해준 웹소켓 엔드포인트 경로이다.
@Configuration
@EnableWebSocketMessageBroker
public class WebSocketConfiguration implements WebSocketMessageBrokerConfigurer {

    @Value("${front-server.platform}")
    private String platformUrl;

    @Value("${front-server.auth}")
    private String authUrl;

    @Value("${front-server.manager}")
    private String managerUrl;

    @Override
    public void configureMessageBroker(MessageBrokerRegistry config) {
       config.enableSimpleBroker("/ws/v1/topic"); // 클라이언트가 구독할 수 있는 목적지(prefix)를 설정합니다.
       config.setApplicationDestinationPrefixes("/ws/v1/app"); // 메시지를 보낼 때 사용하는 prefix를 설정합니다.
    }

    @Override
    public void registerStompEndpoints(StompEndpointRegistry registry) {
       registry.addEndpoint("/ws/v1/offline-store-pad")
          .setAllowedOriginPatterns(
             "http://localhost:3000",
             platformUrl,
             authUrl,
             managerUrl
          ).withSockJS(); // STOMP 엔드포인트를 설정하고, SockJS 지원을 추가합니다.
    }
}
그 다음 stompjs의 Client 객체를 초기화해주는데, 소켓이 연결되었을 때(onConnect), 연결 도중 에러가 발생했을 때(onStompError), 웹소켓 통신이 끊겼을 때(onWebSocketClose) 콜백함수를 각각 정의해주었다. 소켓이 연결되면 stompClient 객체는 '/ws/v1/topic/call-store/${slug}' 경로를 구독한다. 해당 경로로부터 오는 메시지를 수신받기 위해 설정해주는 것이다. 구독한 경로로부터 메세지를 받았을 때 실행할 핸들러 함수도 매핑해준다.(handleReceiveMessage())
stompClient = new Client({
	webSocketFactory: () => socket,
	onConnect: () => {
		stompClient!.subscribe(`/ws/v1/topic/call-store/${slug}`, handleReceivedMessage);
		toast.success('소켓이 연결되었습니다.');
	},
	onStompError: (frame) => {
		console.error('Broker reported error: ' + frame.headers['message']);
		console.error('Additional details: ' + frame.body);
	},
	onWebSocketClose: () => {
		toast.error('소켓 연결이 끊어졌습니다. 재연결을 시도합니다...');
	},
});
아래 코드는 백엔드 코드 중 일부인데, CDR API가 호출되었을 때 실행되는 코드로, '/ws/v1/topic/call-store/${slug}' 경로로 웹소켓 메시지를 전송한다.
@RabbitListener(queues = "#{queue.name}")
public void receiveMessage(RabbitMqMessageDto messageDto) {
    log.info("RabbitMqMessage RECEIVED: {}", messageDto.toString());
    try {
       String slug = storeRepository.findSlugByTel(messageDto.virtualNumber())
          .orElseThrow(() -> new ApplicationException(ApplicationError.STORE_NOT_FOUND));
       String topicPath = "/ws/v1/topic/call-store/%s".formatted(slug);
       callWebSocketService.sendMessage(topicPath, messageDto); // 메시지를 WebSocket으로 보냅니다.
    } catch (Exception exception) {
       log.error("RabbitMqMessage Handling Error");
    }
}
이제 이렇게 만든 stompClient 객체를 활성화 시켜, 웹소켓 연결을 활성화한다.
stompClient.activate()앞서 매핑해준 핸들러 함수가 서버로부터 전송된 메시지의 실질적인 처리를 담당한다. 파싱하길 원하는 데이터가 있다면 여기서 처리해주면 된다. 지금은 일단 전화를 건 고객의 번호와 전화 시각에 대한 정보만 가져와서 보여주도록 구현했다.
const handleReceivedMessage = (message: IMessage) => {
	const callInformation = JSON.parse(message.body) as CustomerInformation;
	setCustomerInformation({
	fromNumber: callInformation.fromNumber,
	stardDate: callInformation.stardDate,
	});

	setOpenModal(true);
};
그리고 웹소켓 연결이 끊어졌을 때, 새로운 stompClient 객체를 생성해서 재연결을 시도하기 위해 다음의 코드를 추가해주었다. 이제 이 컴포넌트는 5초에 한 번씩 stompClient의 연결 상태를 점검한다.
const reconnectInterval = setInterval(() => {
  if (stompClient && !stompClient.connected) {
    connect()
  }
}, 5000)
마무리
이렇게 해서 Websocket으로 서버와의 실시간 통신을 구현해보았다.

고민해볼 점
- 주기적으로 재연결을 시도하는 기능을 구현할 때 setInterval()을 사용하는 것이 최선일까?